Tyre Guide

Choosing tyres can be difficult as there are lots of factors involved in making the decision on your new tyres. There are certain pieces of information that are critical to getting the correct tyres and you can use the following guide to help get there as quickly and painlessly as possible. We have broken the various information down into sections to make it easier to digest.
Tyre Sizing
Tyre sizes can be displayed in many different ways. You can find your tyre size on the side wall of your existing tyre and it is important to make sure the details match before placing an order. Agricultural tyres come in a variety of different configurations and are listed in both metric and imperial sizing formats. These can be identified as follows:
Metric sizing is similar to what you would find on most car tyres. There are usually 3 numbers separated by either "/" or "-" or "R".
Metric Tyre Sizes - e.g. "165 / 70 - 10"
"165" Tyre Width (mm)
In this case width = 165mm.
"70" Tyre Profile
This is the tyre sidewall height dimension measured as a percentage of the width. In this example the sidewall height would be 70% of 165mm (approx. 115mm).
"10" Rim Diameter (Inches)
This is the diameter of the wheel or rim that the tyre requires (10" in this example)
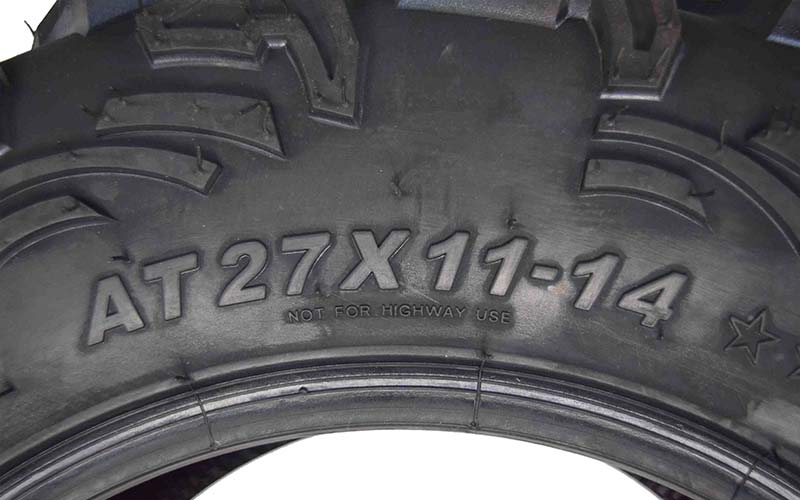
Imperial sizing is still very common on lots of the agricultural and ATV Tyre sizes. There are usually 3 numbers separated by "x" or "-"
Imperial Tyre Sizes - e.g. "25x8-12"
"25" Tyre Diameter (inches)
In this case the height or diameter of the tyre = 25 Inches
"8" Tyre Width (inches)
In this case the width of the tyre = 8 Inches
"12" Rim Diameter (Inches)
This is the diameter of the wheel or rim that the tyre requires (12" in this example)
Tyre Construction Types
The symbol before the rim diameter measurement helps identify what the construction type of the tyre is
"-" Crossply Construction
"B" Belted Bias Construction
"D" Diagonal Bias Construction
The above types of construction are all similar as they all feature woven plies of material into the construction of the tyres, each in a slightly different way.
"R" = Radial Construction
These Differ to the above cross and bias ply tyres as they feature a radial belt that runs around the circumference of the tyre. It is always recommended to run tyres of the same construction type on the same axle or machine. Mixing tyre types can provide unpredictable handling and operating characteristics as well as causing premature wear
What Do The Markings On The Tyre Mean?
If you are wondering what all the numbers and letters on a tyre side-wall mean, then you are certainly not alone! There are a number of pieces of information that are important and essential when choosing the correct tyre for the application. There is more to choosing a tyre than just the size required. Tyres are made and tested to work under certain criteria and limitations and the marking found on the sidewall of the tyre, all help choose the correct tyre for the application.
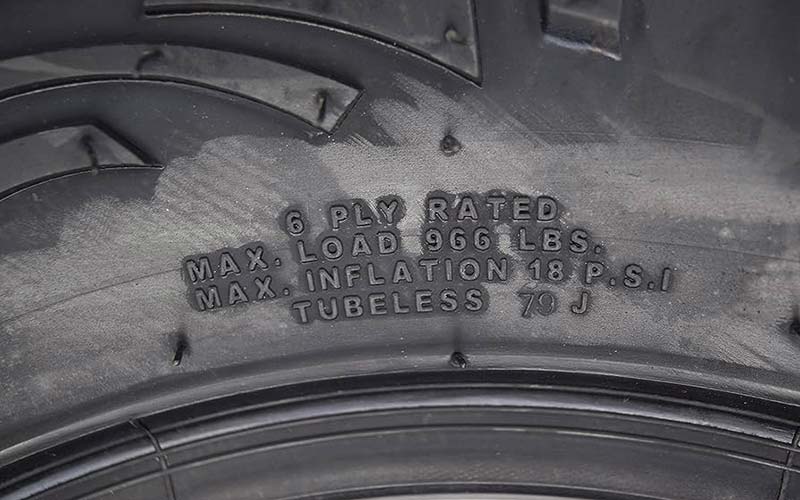
Maximum Inflation Pressure
Maximum Inflation Pressures show what the maximum pressure that should be used to 'seat the beads' of the tyres onto the rim. Agricultural, Turf & ATV tyres are notoriously difficult to fit and it is tempting to inflate the tyre pressure far beyond the maximum pressure marked on the sidewall. This can cause premature failure of the structure of the tyre and is something that should be avoided at all costs. The use of the correct tyre lubricant and fitting equipment is always recommended to ensure the safe operation and continued reliability of the tyre.
Operating Pressure
Operating Pressure shows what the optimal tyre pressure is to use in the tyre. If the tyre has a load speed index, the operating pressure is where the maximum load and speed are achieved. Inflating the tyre beyond the recommended operating pressure will not increase the carrying capacity or performance of the tyre. This differs from Maximum Inflation Pressure, as this is the pressure that the tyre has been designed and tested to run at to perform at optimal levels.
Load Index
Load Index is the limit of weight that the tyre can safely carry at the recommended operating pressure. Tyre manufacturers design the tyres to operate within certain weight parameters. Once the tyre has passed the tests, it is awarded a load rating. It is essential that the correct load rating is used for all tyres. Most vehicles used around the farm are worked hard and fitting a tyre that doesn't meet the requirements of the conditions can lead to premature wear, tyre damage or failure. Load indices are usually denoted by a number. The number itself is not the actual weight carried but represents the maximum weight that the tyre has been designed and tested for.
Speed Rating
Speed Rating is the maximum speed that the tyre has been designed to operate at. As with the load index, the speed rating is an important part of any tyre purchase. Ensuring you have the correct tyre for the job means better operation, reduced downtime and associated costs and increased overall value. Speed indices are usually shown as a letter ranging from A1 (3mph) to Z (>149mph). Some tyres may not have any load speed index marked on the sidewall, but most e-marked tyres will show the load speed index. The load speed index is usually clearly marked on at least one of the sidewalls of the tyres.
PLY Ratings (PLY or P.R.)
Ply Ratings can be quite confusing in modern times and used to be the standard way to represent the overall strength of the tyre. Ply rating used to show how many plies of rubber that were used to make up the construction of the tyre. For example, if a tyre had a 6PLY rating, it would be made up of 6 plies (layers) of rubber. Modern advances in vehicle tyre technology have led to other materials than rubber being used and construction methods increasing the strength of the tyre. The PLY rating is less commonly used to convey the number of plies and is now more relevant in showing the strength of the tyre AS IF it had that number of plies of rubber. Tyre ply rating is still useful in assessing the overall strength and puncture resistance of the tyre. In some cases, PLY ratings are not shown and instead, there is a star symbol. One star is equivalent to 2 plies so a 3* rating is equivalent to a 6 PLY.
Mud/Snow (M+S Marking)
Some tyres may have been tested and marked suitable for mud and snow conditions or in winter use. The M+S mark or symbol shows that these tyres will perform better in those conditions than a typical summer or non M+S marked tyre.
E-Marking
E-Marks show the specific number allocated to the tyre, that have been allocated for use by the EU. The 'E mark' or 'e number' shows that the tyre has been manufactured to a specific criteria and recorded by the EU for use in the EU. All tyres used on PLG registered vehicles including All terrain vehicles and Utility Vehicles must have e marked tyres to be classed as roadworthy / legal. E marks are also a requirement to pass an MOT test in the UK for PLG registered vehicles.
DOT Codes
Dot Codes are used to identify when a tyre was made. It is usally in the form of a 4 digit code and can be split in to the first two and second two digits e.g. "1620" This indicates that the tyre was made in the 16th week (16) of the year 2020 (20). This can be useful to know in certain applications such as trailers and caravans.
What is a Tyre Load Index?
A tyre load index shows what weight a tyre is capable of carrying, when installed to manufacturer recommendations and pressures. Some tyres may have multiple load capacities at different speeds and pressures. Always refer to the manufacturer guidelines when choosing new tyres and ensure that the load and speed index is suitable for your machinery.
Below is a table of the most common load index marks found on the sidewall of tyres:
| Load Index | Load (KG) | Load Index | Load (KG) | Load Index | Load (KG) | Load Index | Load (KG) | Load Index | Load (KG) |
|---|---|---|---|---|---|---|---|---|---|
| 0 | 45 | 45 | 165 | 90 | 600 | 135 | 2180 | 180 | 8000 |
| 1 | 46.2 | 46 | 170 | 91 | 615 | 136 | 2180 | 181 | 8250 |
| 2 | 47.5 | 47 | 175 | 92 | 630 | 137 | 2240 | 182 | 8500 |
| 3 | 48.7 | 48 | 180 | 93 | 650 | 138 | 2360 | 183 | 8750 |
| 4 | 50 | 49 | 185 | 94 | 670 | 139 | 2430 | 184 | 9000 |
| 5 | 51.5 | 50 | 190 | 95 | 690 | 140 | 2500 | 185 | 9250 |
| 6 | 53 | 51 | 195 | 96 | 710 | 141 | 2575 | 186 | 9500 |
| 7 | 54.5 | 52 | 200 | 97 | 730 | 142 | 2650 | 187 | 9750 |
| 8 | 56 | 53 | 205 | 98 | 750 | 143 | 2725 | 188 | 10000 |
| 9 | 58 | 54 | 212 | 99 | 775 | 144 | 2800 | 189 | 10300 |
| 10 | 60 | 55 | 218 | 100 | 800 | 145 | 2900 | 190 | 10600 |
| 11 | 61.5 | 56 | 224 | 101 | 825 | 146 | 3000 | 191 | 10900 |
| 12 | 63 | 57 | 230 | 102 | 850 | 147 | 3075 | 192 | 11200 |
| 13 | 65 | 58 | 236 | 103 | 875 | 148 | 3159 | 193 | 11500 |
| 14 | 67 | 59 | 243 | 104 | 900 | 149 | 3250 | 194 | 11800 |
| 15 | 69 | 60 | 250 | 105 | 925 | 150 | 3350 | 195 | 12150 |
| 16 | 71 | 61 | 257 | 106 | 950 | 151 | 3450 | 196 | 12500 |
| 17 | 73 | 62 | 265 | 107 | 975 | 152 | 3550 | 197 | 12850 |
| 18 | 75 | 63 | 272 | 108 | 1000 | 153 | 3650 | 198 | 13200 |
| 19 | 77.5 | 64 | 280 | 109 | 1030 | 154 | 3750 | 199 | 13600 |
| 20 | 80 | 65 | 290 | 110 | 1060 | 155 | 3875 | 200 | 14000 |
| 21 | 82.5 | 66 | 300 | 111 | 1090 | 156 | 4000 | 201 | 14500 |
| 22 | 85 | 67 | 307 | 112 | 1120 | 157 | 4125 | 202 | 15000 |
| 23 | 87.5 | 68 | 315 | 113 | 1150 | 158 | 4250 | 203 | 15500 |
| 24 | 90 | 69 | 325 | 114 | 1180 | 159 | 4375 | 204 | 16000 |
| 25 | 92.5 | 70 | 335 | 115 | 1215 | 160 | 4500 | 205 | 16500 |
| 26 | 95 | 71 | 345 | 116 | 1250 | 161 | 4625 | 206 | 17000 |
| 27 | 97.5 | 72 | 355 | 117 | 1285 | 162 | 4750 | 207 | 17500 |
| 28 | 100 | 73 | 365 | 118 | 1320 | 163 | 4857 | 208 | 18000 |
| 29 | 103 | 74 | 375 | 119 | 1360 | 164 | 5000 | 209 | 18500 |
| 30 | 106 | 75 | 387 | 120 | 1400 | 165 | 5150 | 210 | 19000 |
| 31 | 109 | 76 | 400 | 121 | 1450 | 166 | 5300 | 211 | 19500 |
| 32 | 112 | 77 | 412 | 122 | 1500 | 167 | 5450 | 212 | 20000 |
| 33 | 115 | 78 | 425 | 123 | 1550 | 168 | 5600 | 213 | 20600 |
| 34 | 118 | 79 | 437 | 124 | 1600 | 169 | 5800 | 214 | 21200 |
| 35 | 121 | 80 | 450 | 125 | 1650 | 170 | 6000 | 215 | 21800 |
| 36 | 125 | 81 | 462 | 126 | 1700 | 171 | 6150 | 216 | 22400 |
| 37 | 128 | 82 | 475 | 127 | 1750 | 172 | 6300 | 217 | 23000 |
| 38 | 132 | 83 | 487 | 128 | 1800 | 173 | 6500 | 218 | 23600 |
| 39 | 136 | 84 | 500 | 129 | 1850 | 174 | 6700 | 219 | 24300 |
| 40 | 140 | 85 | 515 | 130 | 1900 | 175 | 6900 | 220 | 25000 |
| 41 | 145 | 86 | 530 | 131 | 1950 | 176 | 7100 | 221 | 25750 |
| 42 | 150 | 87 | 545 | 132 | 2000 | 177 | 7300 | 222 | 26500 |
| 43 | 155 | 88 | 560 | 133 | 2060 | 178 | 7500 | 223 | 27250 |
| 44 | 160 | 89 | 580 | 134 | 2120 | 179 | 7750 | 224 | 28000 |
What is a Tyre Speed Rating?
A tyre speed rating shows what speed a tyre is capable of achieving, when installed to manufacturer recommendations and pressures. A speed rating is often combined with a load rating to show what weight a tyre will carry up to a certain speed. Always refer to the manufacturer guidelines when choosing new tyres and ensure that the load and speed index is suitable for you machinery.
Below is a table of the most common Speed Rating marks found on the sidewall of tyres
| Speed Mark | Max (KM/h) | Max (Mph) | Speed Mark | Max (KM/h) | Max (Mph) | Speed Mark | Max (KM/h) | Max (Mph) | Speed Mark | Max (KM/h) | Max (Mph) |
|---|---|---|---|---|---|---|---|---|---|---|---|
| A1 | 5 | 3 | B | 50 | 31 | L | 120 | 75 | U | 200 | 124 |
| A2 | 10 | 6 | C | 60 | 37 | M | 130 | 81 | H | 210 | 130 |
| A3 | 15 | 9 | D | 65 | 40 | N | 140 | 87 | V | 240 | 149 |
| A4 | 20 | 12 | E | 70 | 43 | P | 150 | 94 | W | 270 | 168 |
| A5 | 25 | 16 | F | 80 | 50 | Q | 160 | 100 | Y | 300 | 186 |
| A6 | 30 | 19 | G | 90 | 56 | R | 170 | 106 | Z | >240 | >149 |
| A7 | 35 | 22 | J | 100 | 62 | S | 180 | 112 | |||
| A8 | 40 | 25 | K | 110 | 68 | T | 190 | 118 |
A load speed index is usually found on the sidewall of a tyre and is what the manufacturers have tested and rated the maximum loads and speeds that the tyre is capable of. It is very important that you choose the correct load / speed index for your vehicle as per the vehicle manufacturers recommendations. It is usually safe to increase the load / speed index, but again, manufacturer guidelines should be followed.
A load speed index gives the weight and speed a tyre is capable of e.g 116D would indicate that the tyre is capable of carrying 1250kg up to a speed of 40mph. Often in agricultural tyres, the load speed index can alter so that a vehicle travelling at a lower speed may be able to carry more weight. It is always worth checking the tyre manufacturers specifications for further details on this.